A good web hosting service provides you with an FTP account through which you can maintain and administer your site. Under Windows, FTP connection can be established via the DOS prompt, but an FTP client presents a more user friendly interface. Here, we look at FTP Explorer, which is a freely available FTP client for the Windows system. You can download it from www.ftpx.com.
Once you install this program, it can be accessed from the Programs menu. The FTP Explorer might not have some great features found in commercially available software such as CuteFTP or WS-FTP but it serves its purpose well and is quite fast.
Sponsored Links
Step 1 – Making an account
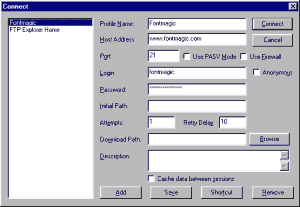
On starting FTP Explorer, you are presented with the Connect window. Here you can specify the various details of the server you plan to connect to.
This window with all its text fields might look daunting at the first glance. Here is a description of the common fields:
- Profile name: This allows you to name the connection and can be anything of your chosing. Make it simple and easy to remember. So for www.fontmagic.com, I use Fontmagic as the profile name.
- Host address: The address of your server like www.fontmagic.com.
- Port: Leave this at 21 unless your server uses a different port (unlikely). Also, leave the two checkboxes for Use PASV Mode and Use Firewall, unchecked.
- Login: Type your login name and click on the Anonymous checkbox to remove the check mark.
- Password: Type your password
- Initial Path: You can remove any value if it exists.
- Attempts: Leave it at its default value of 1.
- Retry Delay: Leave this at its default value of 10.
- Download Path: This field lets you specify the directory in which any downloaded files will be stored. Leave it blank or select a download directory.
- Description: Allows you at add some explanatory text for the connection.
- Cache data between sessions: Can be left blank.
Once you have filled all the required fields, click on the Add button to add this account to the list on the left.
The program stores all what you enter in the text fields in its database, so you don’t have to repeat the process for the same server the next time.
Step 2 – Establishing a connection
Start an Internet connection, if you are not connected.
In FTP Explorer, select the account name from the list on the left in the Connect window and click on the Connect button.
The program will try to find the host and establish a connection. As the program sends commands to the host the information is displayed at the bottom. Once this is done successfully, the right window displays the listing of directories and files found at the server while the left displays the directory tree. You should also get a “Transfer complete” message at the bottom.


Step 3 – Changing Directory
The right window displays the list of directories found on the server. To open a directory, double-click on it. FTP Explorer will now try to retrieve the directory information from the server and display it in the right window.
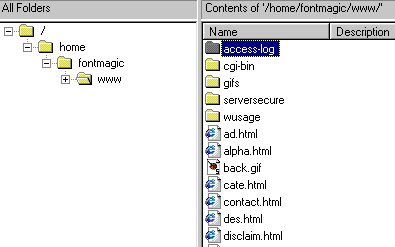
You’ll notice that the directory tree in the left window expands and to display the listing of the directory in use, click on the ‘+’ sign in front of the directory name. Also, the path of the present working directory is at the top of the right window.

