
I am an avid lepidopterist and want to put pictures of my collection on a blog for sale. I read that one of the best ways to protect ownership of digital photographs is through the use of watermarks. Initially I would be using my digital camera but would like to employ a professional photographer later on. Could you tell me the easiest way to put a transparent watermark on these photographs?
Marc Cooley
A watermark when added to an image changes it… so the first thing to remember is to make a copy of the original photographs and work on them. Now to make a watermark, all we need is an image editor and there are tons of these available.
Sponsored Links
For example, the free online Pixlr.com editor is more than sufficient for our needs and can quickly be employed to put a transparent watermark on photographs and pictures. By the way, I hope by “transparent watermark” you mean one which is semi-opaque and lets the underlying image show through… because that’s what I have assumed!
Benefits of transparent watermarks
- Can be text, image, objects (such as lines) or a combination of these.
- Are less obtrusive because one can see the underlying image.
- Can be larger than their opaque counterparts and thus more difficult to remove.
- Can be placed right in the middle of the photograph without spoiling (much) the picture.
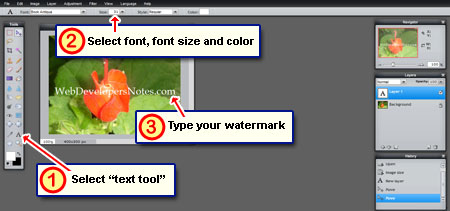
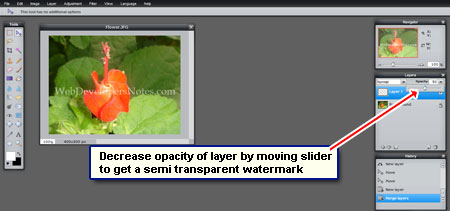
It’s quite easy to put a transparent watermark on a photograph – place the watermark in a new layer over the picture layer and then decrease the opacity. Obviously, this is can only be done in image editors that support layers or lets you change the opacity of objects and text. FYI, Layers are like transparent sheets (digital, of course) that one can place over an image. You’ll understand the concept better once you get your hands dirty with an image editor – let’s start.
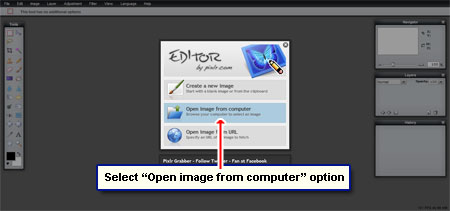
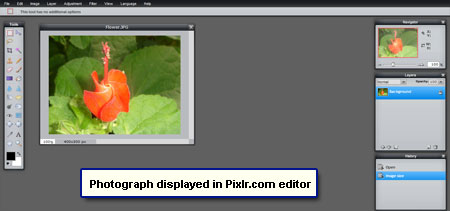
How to put a semi transparent watermark using Pixlr.com
The free online pixlr.com editor is like a scaled down version of Adobe Photoshop, the most famous of all image editors, and supports many features including layers. We will need this functionality to put semi transparent watermark on pictures and photographs. The steps are outlined below and the slideshow has the screenshots for reference:


To put your company logo as a transparent watermark, you would need to open it along with the photograph. Select the logo image and use the Ctrl-C key combination to copy it. Move to the photograph and paste it with Ctrl-V. Change the opacity of this layer as required.
Putting a watermark on a photograph always involves a trade-off. A large watermark prevents download and copying of photos (OK, not ‘prevent’ but deter illegal use), but ruins the photograph. A small watermark, on the other hand, is easy to get rid of (read how to remove a watermark from an image). So it’s really up to you to decide what lies in your interest.


Thank you sir. What an excellent teaching aid and editing software… and all online. If only Adobe realizes and puts up something similar and not charge us a bomb for their software.Yours is an excellent post. I’m so happy to have found your guide.
Oh! I have just thought, are you Mr Adobe (if there is such a named individual)?
Yours
KK