All free Gmail accounts offer forwarding and POP/IMAP access which you can use to download emails from your online account to Outlook Express program to store a copy of your Gmail messages on your computer. The process is simple and you’ll find step by step instructions along with screenshots below. Please note that we shall be using the POP access option and not IMAP.
If you plan to access the Gmail email account from more than one device, I strongly suggest using IMAP. This will ensure all email messages are synchronised across the various devices. Thus, if you delete a message from your computer, it would be removed from your cellphone too!
Sponsored Links
Forwarding your emails
But hold on… do you have an email account already configured in Outlook express? If so, you actually don’t need to add Gmail to the client. You can simply forward all Gmail emails to that account. Simple and quick. But if you’re like me and want to keep things “organized” (the quotes are because of what my wife says about my work habits – you know what I mean), read the steps below to add Gmail to Outlook Express.
Step 1 – enable POP access on Gmail
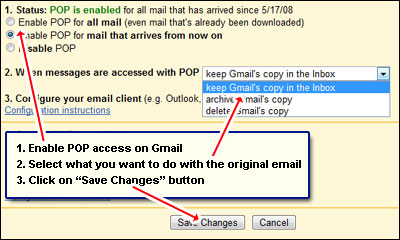
The first step in adding Gmail to Outlook Express is to confirm whether the POP access is enabled on your account. Log in to your Gmail account and go to the settings section (link found near the top right). Under the Forwarding and POP/IMAP tab, move to the POP Download section and make sure the option is enabled by selecting one of the two options: Enable POP for all mail (even mail that’s already been downloaded) OR Enable POP for mail that arrives from now on. Now choose what you would like to do with the copy of the email message – let it lie in your Gmail account, delete it or archive it. I recommend you pick the first option of keeping the copy in the online account (there is copious amount of space, so why bother?). Remember to click on “Save Changes” button at the bottom.
Step 2 – Adding Gmail to Outlook Express
Now comes the interesting part of adding Gmail to Outlook Express. Again, the process is fairly simple – simply follow the instructions and screenshots below.
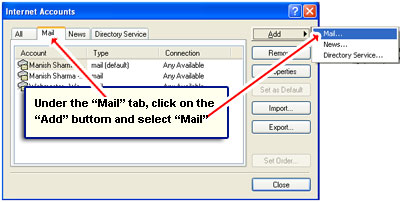
Start Outlook Express and go to Tools -> Accounts which displays the Internet Accounts window. Click on the Mail tab in the pop-up window and then Add -> Mail.
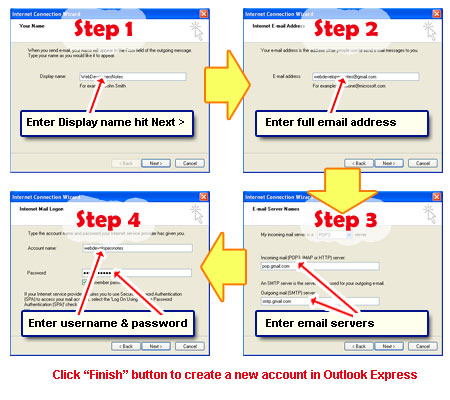
The Internet Connection Wizard window now awaits your inputs. Start by entering a Display name which can be anything you want – your name, company name… whatever.
Then enter your full Gmail address.
For email server configuration, enter pop.gmail.com and smtp.gmail.com as incoming and outgoing email server, respectively.
Finally, provide the program with your Gmail username and the account password and click on “Finish” button when done.
You’re back at the Internet Accounts window which now shows the newly created Gmail account as pop.gmail.com. Don’t close this window yet because we still need to change some settings. Note: If you have closed this window, you can bring it up again – click on “Tools” (from the top menu), select “Accounts” and then move to the “Mail” tab.
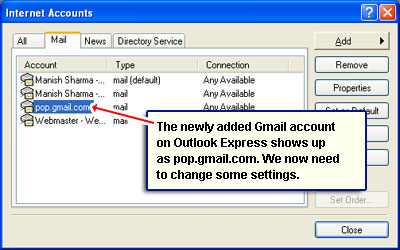
New Gmail account configuration
Almost there… we just need to configure the new Gmail account you’ve added on Outlook Express. Select the pop.gmail.com account from the Internet Accounts window and click on Properties which pops up the email account properties window.
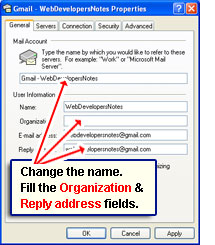 Under the General tab, enter a descriptive name for the account. This step is optional – you can retain pop.gmail.com or change it to something else – anything! Fill up the Organization and Reply address fields – this too is optional but recommended.
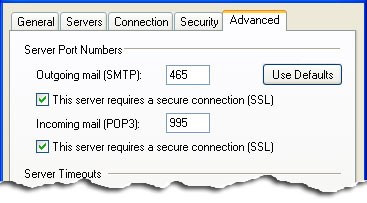
Now move to the Advanced tab. Check the boxes in front of This server requires a secure connection (SSL) under both Incoming and Outgoing sections. The Incoming mail (POP3) port number changes to 995. Put 465 in the outgoing port field.
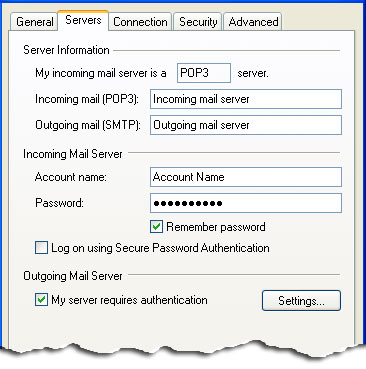
Finally click on the Servers tab and put a tick mark for “My server requires authentication“.
Click on the “Apply” button and then the “OK” button.
You have now successfully configured your Gmail account in Outlook Express email program. Enjoy!
