
Gmail filters for email messages is probably the most useful and overlooked feature of the free service. The filters let you automatically segregate email messages based on the criteria you specify. Once the emails have been isolated, you then indicate an action to be applied such as deletion, forwarding, archiving etc.
Filters can be applied to both new incoming messages and to older ones. The power behind this automated sorting of emails lies in the robust search technology that Google is so famous for. Let us now look at usefulness of Gmail filters and how you can create these to manage your messages and save time.
Sponsored Links
Create Gmail filters to automatically sort email messages
Gmail filters are created by specifying search criteria that automatically sort email messages in your account. And once the messages are searched and segregated, you can apply an action to be performed on the result. The email filters in Gmail are similar to message rules in Outlook Express or Windows Live Mail; and if you’ve used these in the popular email programs, you’ll have no problems in creating new email filters in your Gmail account.
It’s a two step process to create a Gmail filter. In the first step, you choose search criteria which segregate the email messages and, in the second, you select an action to be applied to the search results. Like most things in Gmail, the options for filtering emails are simple so even beginners are not overwhelmed. But under this cloak of simplicity lies the overbearing powerful search functionality.
Gmail filters are found under Settings – you’ll find the link near the top right. To create your first Gmail filter, go to the Filters tab – refer image below. Now click on the Create a new filter link.

Specify your search criteria – sort emails automatically using Gmail powerful search functionality
As mentioned above, the first step in creating a Gmail filter is to indicate a search criteria based upon which the emails will be searched and segregated and you’ll find a total of six (five text fields and a checkbox).
- From (text field): enter the name of the sender or their email address.
- To (text field): specify the email account to which the email comes to – especially helpful if you have added multiple accounts on Gmail.
- Subject (text field): Enter keywords to search the email subject line.
- Has the words and Doesn’t have (text fields): specify keywords to search the email message body.
- Has attachment (checkbox): results in segregating emails that have attached files.
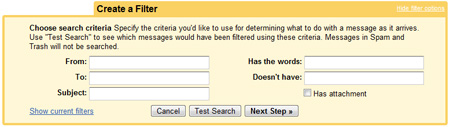
The Test Search button is a convenient way to check your specified search criteria – see if it can dig out any old email messages lying in your account. By the way, messages in the Spam and Trash folders are not checked.
An Example
My cousin keeps sending me pictures she takes through her iPhone. I set up a filter that elegantly segregates her email messages. I entered her email address in the From field, made sure the has attachment box is checked and, to further strengthen the search, I entered “from iPhone” in the Has the words text field – the last criteria was specified because these words are a part of the email signature when she sends messages from the iPhone. Note how I have used different options in the search criteria when I create the Gmail filter which result in getting accurate results.
Choose an action to be executed on the search results
Once you’ve specified the search criteria (and don’t forget to check it using the “Test Search” button) you need to indicate an action to be implemented on the results. Gmail offers you seven different actions that you can apply.
- Skip the Inbox: archive the email message
- Mark as read: marks the email message as read – does not appear in bold in your Inbox
- Star it
- Apply the label: Select and apply a label to the email message
- Forward it to: forwards the email message to another account that you specify
- Delete it: deletes the email message
- Never send it to Spam
Since these are checkboxes, you can have one or more actions applied to the searched results. Furthermore, the actions are executed not only on new incoming messages but also older ones residing in your inbox.
You can have as many email filters as you want in Gmail. However, going overboard would be a waste of time and resources. Gmail filters are there to help you managing emails and be more productive so use them wisely.