A Gif image can contain a maximum of 256 colors. The more the number of colors in a Gif, the more its complexity, and hence, larger the file size. So it is important to decrease the number of colors in a web gif image to decrease its file size. What we need to do it so remove the information for extra or unwanted colors to decrease the web image size.
The previous article (Optimizing Gifs) discusses the first step in decreasing web Gif image file size by cropping the unwanted areas – reducing the physical dimensions of the image. This article details how we can decrease the number of colors in a Gif which brings about further reduction in file size yielding a better optimized web image.
Sponsored Links
All popular image manipulation and graphics software have a color reduction feature. With this tool one can reduce the number of colors in a Gif. For example, take a look at the two very similar images below. It will not be surprising if you will find the two images identical… but they are not! The two differ in color information. It is not necessary that all colors need to be present as pixels in the image. The very fact that an image has information on more colors increases its file size.
![]() 256 color gif: 998 bytes
256 color gif: 998 bytes
![]() 4 color gif: 234 bytes – Reducing information on colors, decreases web image file size.
4 color gif: 234 bytes – Reducing information on colors, decreases web image file size.
Here is another example.
![]() 256 color gif: 1044 bytes
256 color gif: 1044 bytes
![]() 8 color gif: 275 bytes
8 color gif: 275 bytes
You will notice that if we reduce the color information or the number of colors that occur in an image as pixels, the decrease in file size is substantial. The images that have more color information are 4 times the size of the reduced images.
An important point to remember is that reducing the color depth involves a trade-off in the quality of the image; however, most of the times, your gifs will look just fine.
Here are a few examples on controlling color depth. Note the difference in file sizes for each image.
![]() 4 color gif: 521 bytes
4 color gif: 521 bytes
![]() 8 color gif: 706 bytes
8 color gif: 706 bytes
![]() 16 color gif: 907 bytes
16 color gif: 907 bytes
![]() 256 color gif: 1896 bytes
256 color gif: 1896 bytes
 6 color gif: 879 bytes
 16 color gif: 1384 bytes
 64 color gif: 3288 bytes
As I mentioned above, decreasing the number of colors in a Gif image reduces the quality – it leads to pixellation. For example, some of you might not like the 6 color Gif (879 bytes) of the blue can (above). You would definitely have noticed the pixellation at the top and botton of the can. However, take a look at the 16 color Gif (1384 bytes). This image is less than half of the original file size (3288 bytes) and the quality difference it hardly noticeable to the human eye… right?
Anti-aliasing and addition of more colors
One feature that definitely increases the number of colors in an image is anti-aliasing. You can read more about it in separate articles – Anti-Aliasing and Antialiasing and “Halo” formation. In order to make the edges of objects and text smooth, anti-aliasing algorithms add pixels of additional colors.
Before I continue, let me clarify my stance – I am not against anti-aliasing. In fact I use it all the time – BUT I use it only when it’s required. And this is what is important. Do not use anti-aliasing indiscriminately. First decide if it is really necessary… just because you can do it, doesn’t mean you should! I will let examples speak for themselves.
Here is a typical icon from a standard web site navigation menu.
![]() Anti-aliased image – 16 color Gif: 336 bytes
Anti-aliased image – 16 color Gif: 336 bytes
![]() Non Anti-aliased image – 2 color Gif: 193 bytes
Non Anti-aliased image – 2 color Gif: 193 bytes
The question is – would you want to use anti-aliasing on this image? If your client insists… maybe!
Here is another example:
![]() Anti-aliased image – 6 color Gif: 589 bytes
Anti-aliased image – 6 color Gif: 589 bytes
![]() Non Anti-aliased image – 2 color gif: 347 bytes
Non Anti-aliased image – 2 color gif: 347 bytes
I would have definitely used the anti-aliased image because the non anti-aliased one is so very lame (notice the pixellated or jagged edges). But take a note at how I have decreased the number of colors in the anti-aliased image so that its file size is a minimum.
Decreasing the number of colors with Paint Shop Pro (version 5)
- Open an image or create a new one.
- Click Colors – Count Colors Used to get an idea of the number of colors in the image. Note: Be sure to flatten the image else Paint Shop Pro will count the color in the active layer only.
- Click on Colors – Decrease Color Depth. Paint Shop Pro offers, 2 color (1 bit), 16 color (4 bit), 256 color (8 bit), 32K color (24 bit), 64K color (24 bit) and X color (4/8 bit) in the menu. The 32K color and 64K color have no use when it comes to Gifs since the gif file format can be a maximum of 8 bit. Hence, you should select 2, 16 or 256 color for your image.
- The X-color dialog lets you fine tune the image color depth. I’ve found it very helpful. In this window, you can specify the exact number of colors you want in the image. You would have to play around a little, that is, decrease the number of color, then increase to 16 million colors and then decrease again to get a satisfactory image. All this might seem tedious but it would reduce the image size drastically. (Reducing image size gives me a sort of a kick, I love it!)
- Another tool I’ve found indispensable is the Color Replacer
 . It lets me remove similar colors. For example, the image of a hand holding a blue can was initially a JPEG image that I had downloaded from the Web. It’s file size was 3179 bytes. Decreasing the color depth and employing the color replacer intelligently, I was able to reduce it to a 6 color 879 bytes gif image. The optimized image file size is one-fourth (1/4th) of the original size!
Decreasing the number of colors with Paint Shop Pro (version 8)
- Open an image or create a new one.
- Click layers – Count Layer Colors to get an idea of the number of colors in the image. Note: Be sure to flatten the image else Paint Shop Pro will count the color in the active layer only.
- Click on Image – Decrease Color Depth. Paint Shop Pro offers, 2 color (1 bit), 16 color (4 bit), 256 color (8 bit), 32K color (24 bit), 64K color (24 bit) and X color (4/8 bit) in the menu. The 32K color and 64K color have no use when it comes to Gifs since the gif file format can be a maximum of 8 bit. Hence, you should select 2, 16 or 256 color for your image.
- The X-color dialog lets you fine tune the image color depth. I’ve found it very helpful because now you can specify the exact number of colors you want in the image. You would have to play around a little, that is, decrease the number of color, then increase to 16 million colors and then decrease again to get a satisfactory image. All this might seem tedious but it would reduce the image size drastically. (Reducing image size gives me a sort of a kick, I love it!)
- Another tool I’ve found indispensable is the Color Replacer
 . It lets me remove similar colors. For example, the image of a hand holding a blue can was initially a JPEG image that I had downloaded from the Web. It’s file size was 3179 bytes. Decreasing the color depth and employing the color replacer intelligently, I was able to reduce it to a 6 color 879 bytes gif image. The optimized image file size is one-fourth (1/4th) of the original size!
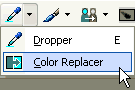
The PSP version 8.0 color replacer tool is found along with the Dropper tool… refer image below.

Reducing the number of colors with Corel Xara
To save an image in Corel Xara (version 2.0), click on File – Export and select .gif extension from the drop down menu. The Gif export bitmap options dialog box contains several options. You can control Dithering and choose color depth (8 bit, 4 bit or 2 bit). You can also specify the exact number of color you want in the image by clicking on the 256 (8 bit) radio button and entering the value in Number of Colors text box. You can select transparency and interlacing and the final dimensions of the image. Another helpful feature of the software is the preview button.
Reducing the number of colors with Adobe PhotoShop
When you Export a Gif image in Adobe PhotoShop version 5.0, the program provides a drop down menu through which you can select the number of colors in the final image. You can also choose the palette and transparency. Higher versions of the software are more suited for web graphics and have several options.
We have now gone through two steps in decreasing web gif image file size – decreasing the physical dimensions and reducing the number of colors. In the next article we see how complexity of an image affects Gif file size and how we should actually create our web Gif images.