Configure Bigpond email in Outlook Express

Configure Bigpond email in Outlook Express cover image
  1. Home
  2. Email
  3. Configure Bigpond email in Outlook Express

Outlook Express is probably the world’s most popular email client. It comes pre-installed with the Windows Vista operating system. However, if Outlook Express is missing from your computer, you can either get it as a bundle with Internet Explorer or use the latest free email client from Microsoft – Windows Live Mail.

In this post I shall be providing step by step instructions on how to add and configure Bigpond email in Outlook Express. This is a simple process and you shall be aided by inbuilt program “wizard”.

Sponsored Links

Note: Vista and Windows 7 users will not have this popular email program on their computers. As far as I know, it is not possible to download Outlook Express on these operating systems as they come with a newer version of the Internet Explorer web browser.

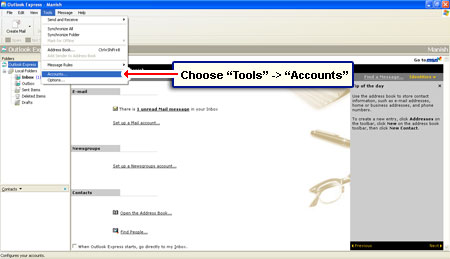
Instructions to add and configure Bigpond email in Outlook Express

We shall be using the POP email protocol to configure your Bigpond email account in Outlook Express. The set up should take less than a couple of minutes and requires you to know the username, password and the Bigpond email settings (the incoming and outgoing mail servers).

FYI, Post Office Protocol lets you download Bigpond email and store it on your local computer. This is almost a requirement for users as the ISP will store messages on its servers for only 180 days!

  • Open Outlook Express email accounts
  • Add email account in Outlook Express
  • Enter the Bigpond email account display name
  • Type in Bigpond email account username and password
  • Enter the full Bigpond email address
  • Enter Bigpond email account settings
  • Click Finish to have the Bigpond email account configured in Outlook Express
  • Close the Outlook Express Internet Accounts window
  1. Start the Outlook Express program and click “Tools” -> “Accounts” – [Slide 1].
  2. In the “Internet Accounts” pop-up window, hit the “Add” button and choose “Mail” – [Slide 2].
  3. Enter a “Display name” for the email account. This is what will be shown in the recipient’s email account – [Slide 3].
  4. Type in your Bigpond email address – YOUR-USERNAME@bigpond.com or YOUR-USERNAME@bigpond.net.au – [Slide 4].
  5. In the next screen, provide Bigpond incoming and outgoing mail settings as below:
    Select POP3 from the “My incoming mail server is a” drop down menu.
    Put mail.bigpond.com in both the Incoming mail (POP3, IMAP, HTTP) server and Outgoing mail (SMTP) server fields – [Slide 5]
  6. Now type in the Bigpond account name (your full email address) and the password. Keep “Remember password” checked unless you want to enter the login information each time you want to download the messages. “Log in using Secure Password Authentication (SPA)” should be NOT be ticked – [Slide 6]
  7. Click the “Finish” button in the following screen. In the Internet Accounts pop-up, you’ll now find the Bigpond email account listed. Close this window – [Slide 7]
  8. Choose “Tools” -> “Send and Receive” to start transferring messages from your online Bigpond email to Outlook Express – [Slide 8]

You may also be interested in knowing how to back up Outlook Express email. This will help you keep a copy of the important correspondence safe in case of program failures or hard disk crashes.

Email ISP Outlook Express