Transparent gifs are special gif images in which we instruct certain color/s not to display. These colors are therefore not rendered by the browser and the background color of the web page is displayed in their place. The instructions on which colors need to be “invisible” are passed at the time of creating the transparent gif image.
For example, take a look at the image below.
 Here is a normal gif image with no transparency. I will now create a transparent version of it and will set the the dark blue color as transparent. Note: This dark blue color occurs at two places in the image – as the color that surrounds the two square and the smaller square inside the bottom pink square.
 This is the transparent gif version created of the above image. Note: since we instructed the dark blue to be transparent, it is not displayed and in its place the background color of this web page (white) shows through. Another important point to note is that all pixels of the dark blue color that occur in the image are made transparent. Thus, even the small dark blue square inside the botton pink square is rendered invisible.
Sponsored Links
How to create transparency in gifs using PaintShop Pro
It is easy to create transparent Gifs in PaintShop Pro.
Since transparency can be applied to the GIF file format and not JPG, we first save the image as a gif. We should also decrease the number of colors in the Gif so that the image size is optimized. Finally, we need to decide which color we want to be rendered as transparent.
 Here is what our starting image looks like. It has a pale blue background color. We will now create a transparent gif version of this image. The color that we will select to make as transparent is the pale blue background color.
Note: This exercise has been done using versions 7.0 and 8.0 of Paint Shop Pro and I assume that the image has been created in another program; i.e. the image was not created from scratch in PaintShop Pro.
Start PaintShop Pro and open the image (File – Open). If it’s a high color image, decrease the number of colors to optimize image size.
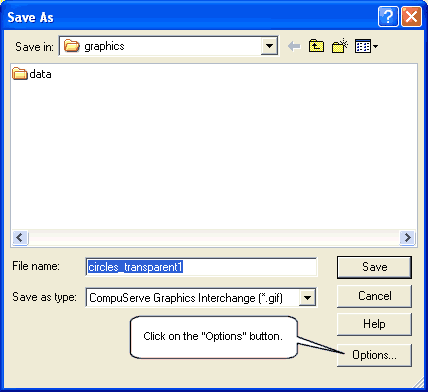
Now select “File – Save As” (or click on the F12 key). This brings up the Image “Save As” window. Click on the “Options” button, found at the bottom of the window. (Refer visual below)
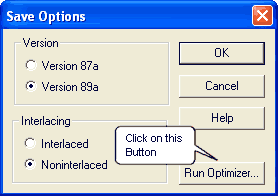
The “Save Options” pop-up will open. Select the appropriate radio buttons in the “Versions” and “Interlacing” options and click on “Run Optimizer” button. (Refer visual below)
PaintShop Pro version 7.0 users
On clicking the “Run Optimizer” button, you will be displayed the Gif Optimizer pop-up window (below). The first tab is Transparency and this is where we set all variables for transparency. This tab has several options; make sure that Areas that match this color radio button is selected. Transparency will be applied to the color that is displayed in the small rectangle (marked by a red border in the visual below).
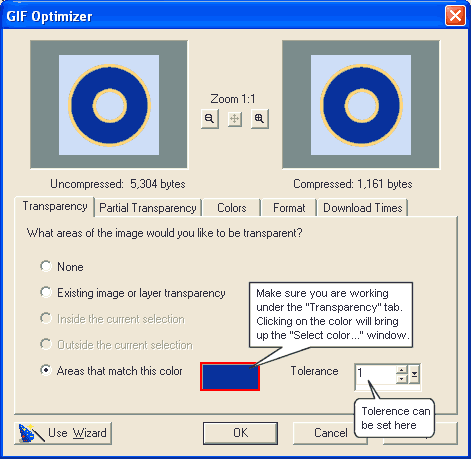
If this is not the color you want, click on it which, brings up the Select color from Palette window. This window displays all the colors in the image. We now select the color which we want to make transparent in our transparent gif – pale blue in our example.
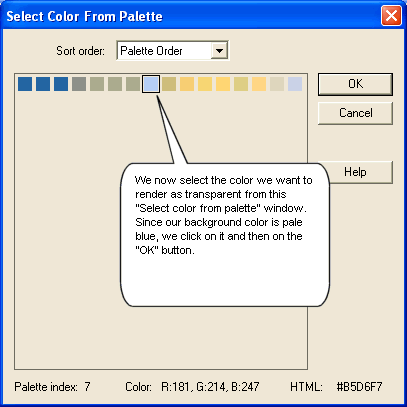
After you select the color, click on the “OK” button which brings you back to the Gif Optimizer window. Note the difference in the original and the result. The pale blue color has been made transparent – in fact, wherever pale blue occurs, its been made transparent.
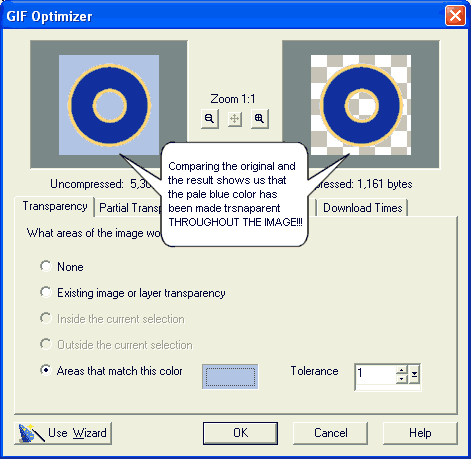
Once you are satisfied with the result, click on the “OK” button and save the image.
To see your creation, place the image on a web page. If the background color of the web page is displayed in place of the transparent color, you have yourself a transparent gif image!
PaintShop Pro version 8.0 users
Its easier to create transparent Gifs in version 8.0 of PaintShop Pro.
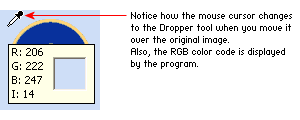
Once you click on the Run Optimizer button, you will be shown the Gif Optimizer pop-up window. Now you need to take your mouse cursor to the original image which would be in the work space. Once you move the mouse over the original image, you will notice that it changes to the Dropper tool. Thus, using the dropper tool, click on the color in the original image which you want as transparent and we are done!
Understanding and defining Tolerance levels when creating transparent gifs
Under the Transparency tab of the Gif Optimizer window, you would have noticed a text field for Tolerance. This allows you to set the level of “Tolerence”, i.e. colors which would be similar to the color you have chosen to make transparent. For example, if we set white as a transparent color and put a value of 32 in the Tolerance text field, light shades of other colors will also be rendered transparent.
Defining transparency for Images created in PaintShop Pro
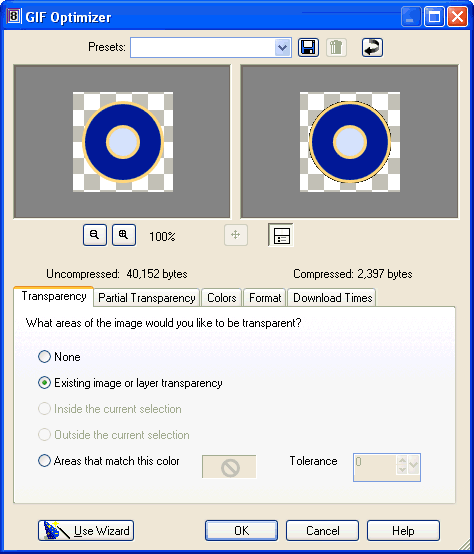
All along, we assumed that we started with a gif image. If we had created this image in PaintShop Pro, we should have used a transparent background and specified the same in “What areas of the image would you like to be transparent?” by checking the “Existing image or layer transparency” radio button in the Gif Optimizer window. (Refer below)
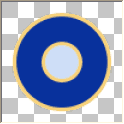 Image created from scratch in PaintShop Pro.
Note the transparent background layer. We can simply specify that the transparency needs to be retained.
